容器仓库是容器化管理中非常重要的一环,相当于 SVN 在程序研发、运维发布中的地位。因此,一个稳定、可靠的容器仓库尤为重要。
目前我知道的的数据仓库有
Docker 官方的 Registry 原生仓库
SuSE 团队推出的出的 Portus:https://github.com/SUSE/Portus
VMWare 中国团队推出的企业级仓库—Harbor
大家熟知的 Maven 私服:Sonatype Nexus3
本文主要介绍下 Sonatype Nexus 3 这个功能强大的产品,它不仅能够用于创建 Maven 私服,还可以用来创建 yum、pypi、npm、nuget、rubygems 等各种私有仓库。而且,Nexus 从 3.0 版本也开始支持创建 Docker 镜像仓库了!
因此,在上述几个产品里面我毫不犹豫的选择了 Nexus3 作为部门的公共数据仓库,一举多得。
部署 创建docker-compose.yaml
1 2 3 4 5 6 7 8 9 10 11 12 13 14 15 16 17 18 19 20 21 22 23 24 25 26 27 28 29 30 31 32 33 version: "3.7" services: nexus3: container_name: nexus3 tty: true image: sonatype/nexus3 volumes: - "./data:/nexus-data" - "/etc/localtime:/etc/localtime:ro" - "/etc/timezone:/etc/timezone:ro" ports: - "8081:8081" - "8082:8082" - "8083:8083" environment: - TZ=Asia/Shanghai user: root deploy: resources: limits: memory: 4G logging: driver: "json-file" options: max-size: "100M"
然后一键部署
https://hub.docker.com/r/sonatype/nexus3/
大概 2 分钟左右可以完成启动,此时可以通过浏览器访问 http://IP 地址:8081 即可出现 nexus 的 web 界面:
配置 默认账户名admin, 密码参阅官方文档, 在./data/admin.password这个文件中
1 Default user is admin and the uniquely generated password can be found in the admin .password file inside the volume. See Persistent Data for information about the volume.
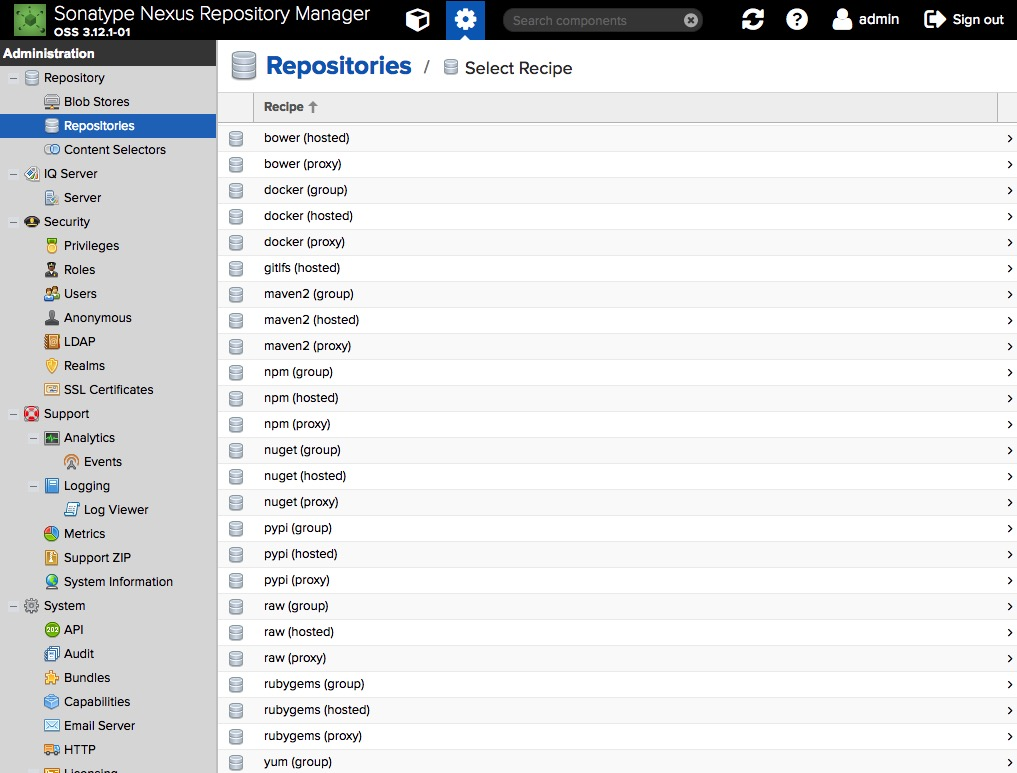
创建 Docker 仓库 回到前面的 repository 界面,点击 repositories 打开页面后点击【create repository】打开仓库类型选择界面
可以看到 Docker 有三种类型,分别是 docker(group),docker(hosted),docker(proxy)。其含义解释如下:
hosted : 本地存储,即同 docker 官方仓库一样提供本地私服功能
proxy : 提供代理其他仓库的类型,如 docker 中央仓库
group : 组类型,实质作用是组合多个仓库为一个地址
开始创建 Docker 仓库
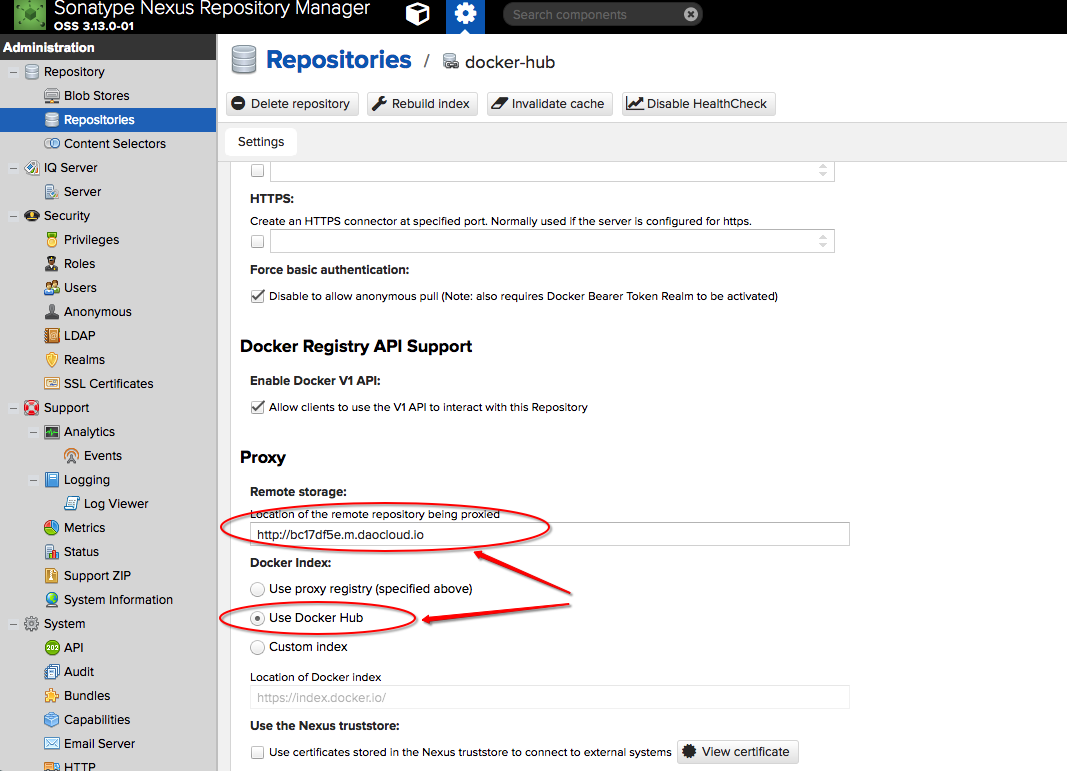
首先,我们创建一个 docker 代理仓库,点击 docker(proxy),如图填写信息
往下翻页,勾上 “Allow clients to use the V1 API to interact with this Repository”,允许 Docker V1 API 请求。
至于代理的对象,我可以选择官方的镜像地址:https://registry-1.docker.io,但是官方的比较慢,所以这里我们可以填写国内的 Docker 镜像加速器地址,比如阿里云或DaoCloud的容器加速
我这里选择了 DaoCloud 的镜像加速,这里为了确保能够拉取 DockerHub 最新的镜像,我选择了 Use DockerHub 这个 Index
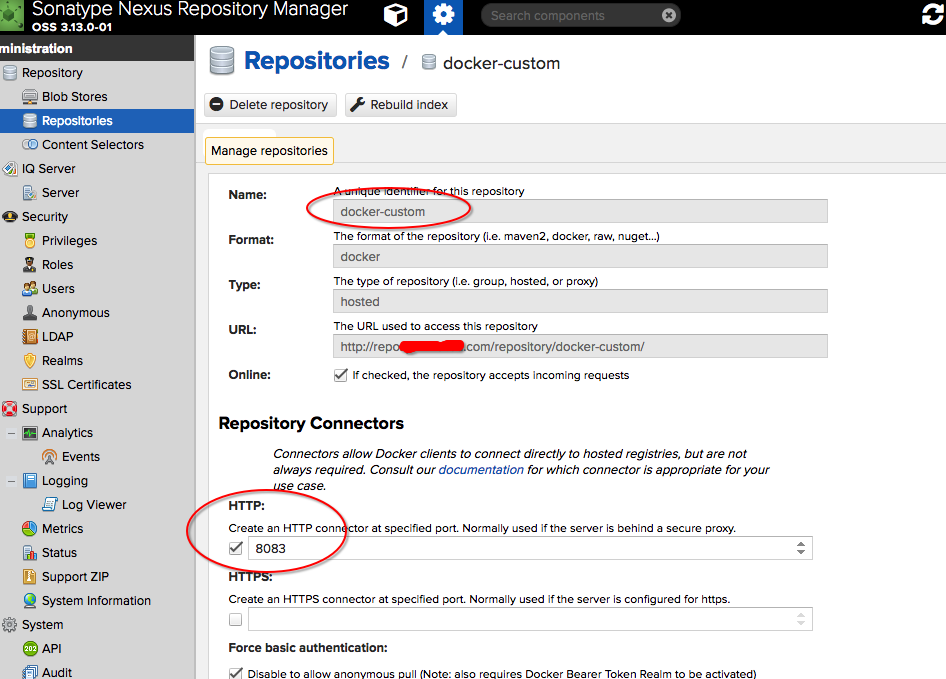
接着,再创建一个本地仓库,这里比较简单,只需要填写本地仓库的名称,比如 docker-hosted,然后填写 HTTP 端口即可,比如 8083
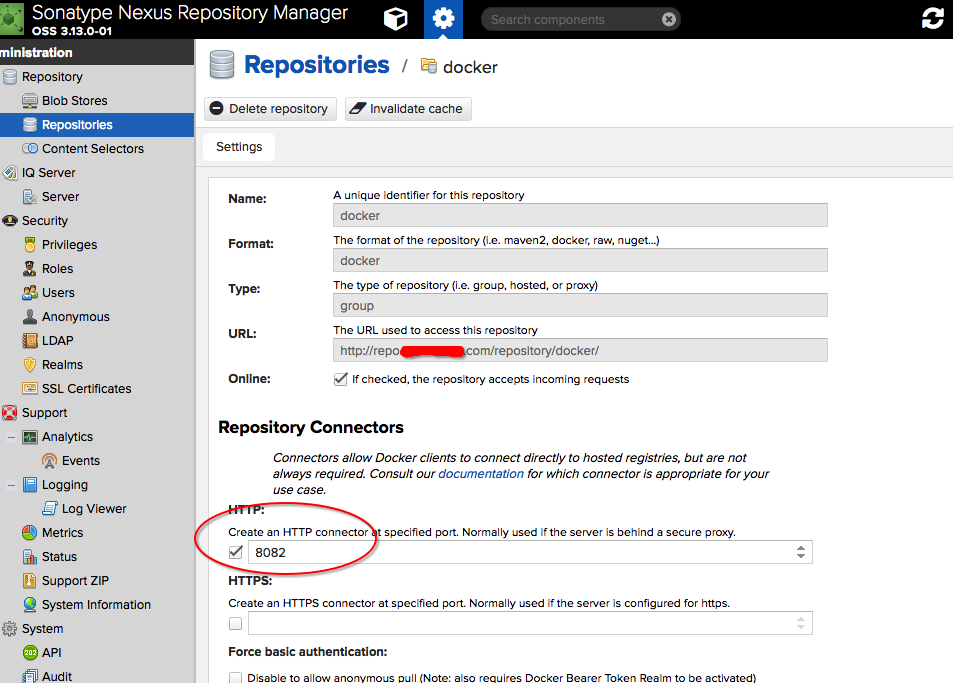
保存之后,最后创建一个聚合仓库(group),将代理仓库和本地仓库聚合到一起使用,这里我命名为 docker,然后端口选择 8082
这里成员仓库的顺序可以稍微规划下,一般来说将本地的放前面,代理第三方的放后面,好处就是优先使用本地或小众的镜像仓库。我这边是用了多个第三方仓库,所有有多个
至此,nexus 在 docker 这一块是部署已经完成了,但是这样并不能很好的使用。因为 group 仓库并不能推送镜像,因为你推送自己制作的镜像到仓库还得通过本地仓库的端口去推送,很不方便!
配置 Nginx 上面配置完了,但是不够完美。
Pull/Push 操作的端口并不相同,我们需要聚合到一个端口, 通过配置 Nginx 匹配请求方法,路径的匹配来分流到不同的端口
我们需要两个域名,一个用作Nexus, 一个用作Docker
例如
nexus.abc.com
docker.abc.com
注意替换里面的IP地址
1 2 3 4 5 6 7 8 9 10 11 12 13 14 15 16 17 18 19 20 21 22 23 24 25 26 27 28 29 30 31 32 33 34 35 36 37 38 39 40 41 42 43 44 45 46 47 48 49 50 51 52 53 54 55 56 57 58 59 60 61 62 63 64 65 66 67 68 69 70 71 72 73 74 75 76 77 78 79 80 81 82 83 84 85 86 87 88 89 upstream nexus_web { server 192.168.1.100:8081 ; } upstream nexus_docker_get { server 192.168.1.100:8082 ; } upstream nexus_docker_put { server 192.168.1.100:8083 ; } server { listen 80 ; listen 443 ssl; server_name docker.abc.com; access_log /data/wwwlogs/docker.abc.com.log access_log_json; ssl_certificate /data/wwwroot/ssl/out/docker.abc.com/docker.abc.com.crt; ssl_certificate_key /data/wwwroot/ssl/out/docker.abc.com/docker.abc.com.key.pem; ssl_protocols TLSv1.1 TLSv1.2 ; ssl_ciphers '!aNULL:kECDH+AESGCM:ECDH+AESGCM:RSA+AESGCM:kECDH+AES:ECDH+AES:RSA+AES:' ; ssl_prefer_server_ciphers on ; ssl_session_cache shared:SSL:10m ; client_max_body_size 0 ; chunked_transfer_encoding on ; set $upstream "nexus_docker_put" ; if ( $request_method ~* 'GET') { set $upstream "nexus_docker_get" ; } if ($request_uri ~ '/search') { set $upstream "nexus_docker_put" ; } index index.html index.htm index.php; location / { proxy_pass http://$upstream ; proxy_set_header Host $host ; proxy_connect_timeout 3600 ; proxy_send_timeout 3600 ; proxy_read_timeout 3600 ; proxy_set_header X-Real-IP $remote_addr ; proxy_buffering off ; proxy_request_buffering off ; proxy_set_header X-Forwarded-For $proxy_add_x_forwarded_for ; proxy_set_header X-Forwarded-Proto http; } } server { listen 80 ; listen 443 ssl; server_name nexus.abc.com; index index.html index.htm index.php; ssl_certificate /data/wwwroot/ssl/out/nexus.abc.com/nexus.abc.com.crt; ssl_certificate_key /data/wwwroot/ssl/out/nexus.abc.com/nexus.abc.com.key.pem; ssl_protocols TLSv1.1 TLSv1.2 ; ssl_ciphers '!aNULL:kECDH+AESGCM:ECDH+AESGCM:RSA+AESGCM:kECDH+AES:ECDH+AES:RSA+AES:' ; ssl_prefer_server_ciphers on ; ssl_session_cache shared:SSL:10m ; access_log /data/wwwlogs/nexus.abc.com.log access_log_json; location /download { root /data/wwwroot/nexus.abc.com; } location / { proxy_pass http://nexus_web; proxy_set_header Host $host ; client_max_body_size 512m ; proxy_connect_timeout 3600 ; proxy_send_timeout 3600 ; proxy_read_timeout 3600 ; proxy_buffering off ; proxy_request_buffering off ; } }
然后再Push镜像的时候只需要把tag加上自己域名即可
例如把官方的nginx推送到自建的仓库
改标签
1 docker tag nginx docker.abc.com/nginx
登录 docker.abc.com
1 docker login docker.abc .com
推送
1 docker push docker.abc .com /nginx
https://zhangge.net/5139.html

